
Getting Started With Japka: Your First Week
A step-by-step Japka tutorial. Sign in, set your currency, add your first transactions and installments, then read your Summary and ask the AI.
Short answer: sign in, pick your currency in Settings, then tap + to log this month’s income and fixed bills. Log every expense right after you pay for a week. On day 7, open Summary to see where the money went. Setup takes about five minutes.
Step 1: Sign in
Open Japka and sign in with email, Apple or Google. Your transactions are saved to your account and sync across your devices, so a new phone never means starting over.
Tip: planning to share your feed with a partner? An invite goes to the email shown under Settings → Current user. If you signed in with Apple and chose Hide My Email, that is a random Apple relay address that forwards to your real inbox (Apple Support), so your partner needs that exact address to invite you. Find it there and send it to them, or have them send you an invitation link instead.
Step 2: Set your preferences
Tap the gear icon at the top of the screen to open Settings:
- Currency: Shekel, Dollar, Euro or Pound. Japka picks one from your phone’s region; change it here if it’s wrong.
- Theme: light, dark, or follow your phone.
- Language: Japka follows your phone’s language, English or Hebrew, with full right-to-left support.
Step 3: Add your first transaction
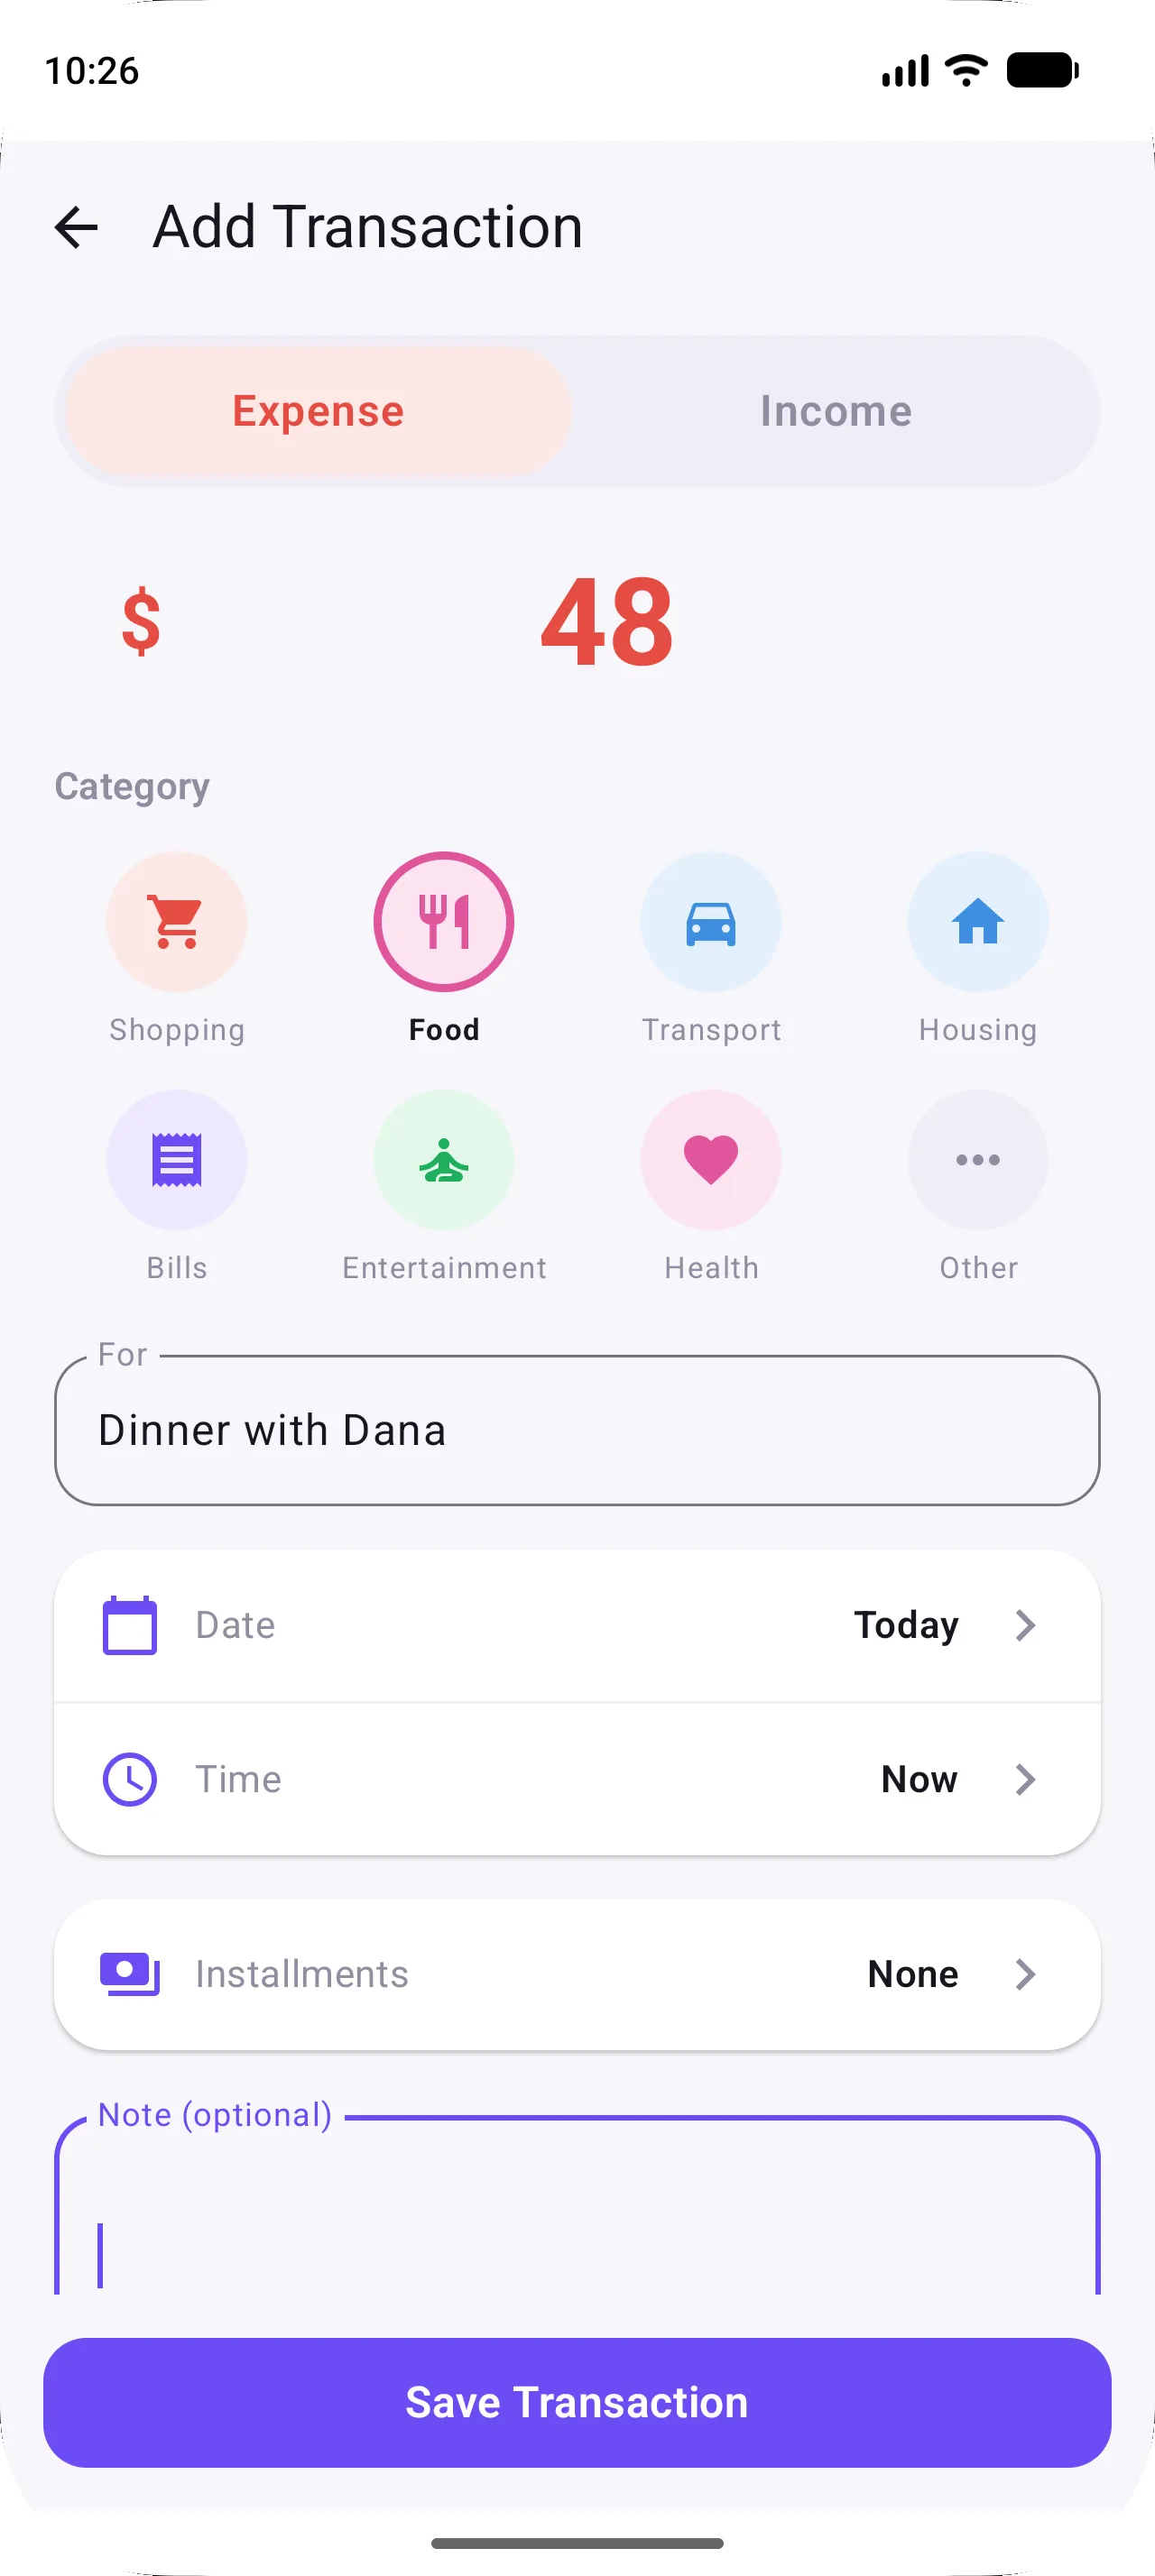
- Tap the purple + button.
- Choose Expense or Income.
- Type the amount.
- Pick a category, such as Food, Transport or Bills.
- Fill in For: who or what the money was for (“Dinner with Dana”).
- Optionally change the date and time, or add a note.
- Tap Save Transaction.
The transaction appears in your Feed, grouped by day. Tap any transaction to edit it later.
Start with your income for this month (salary, freelance work) and the big fixed expenses you already know about, like rent. That gives your summary a solid baseline from day one.
Already tracking in a spreadsheet? Import it from a CSV file instead of retyping.
Step 4: Add installments the right way
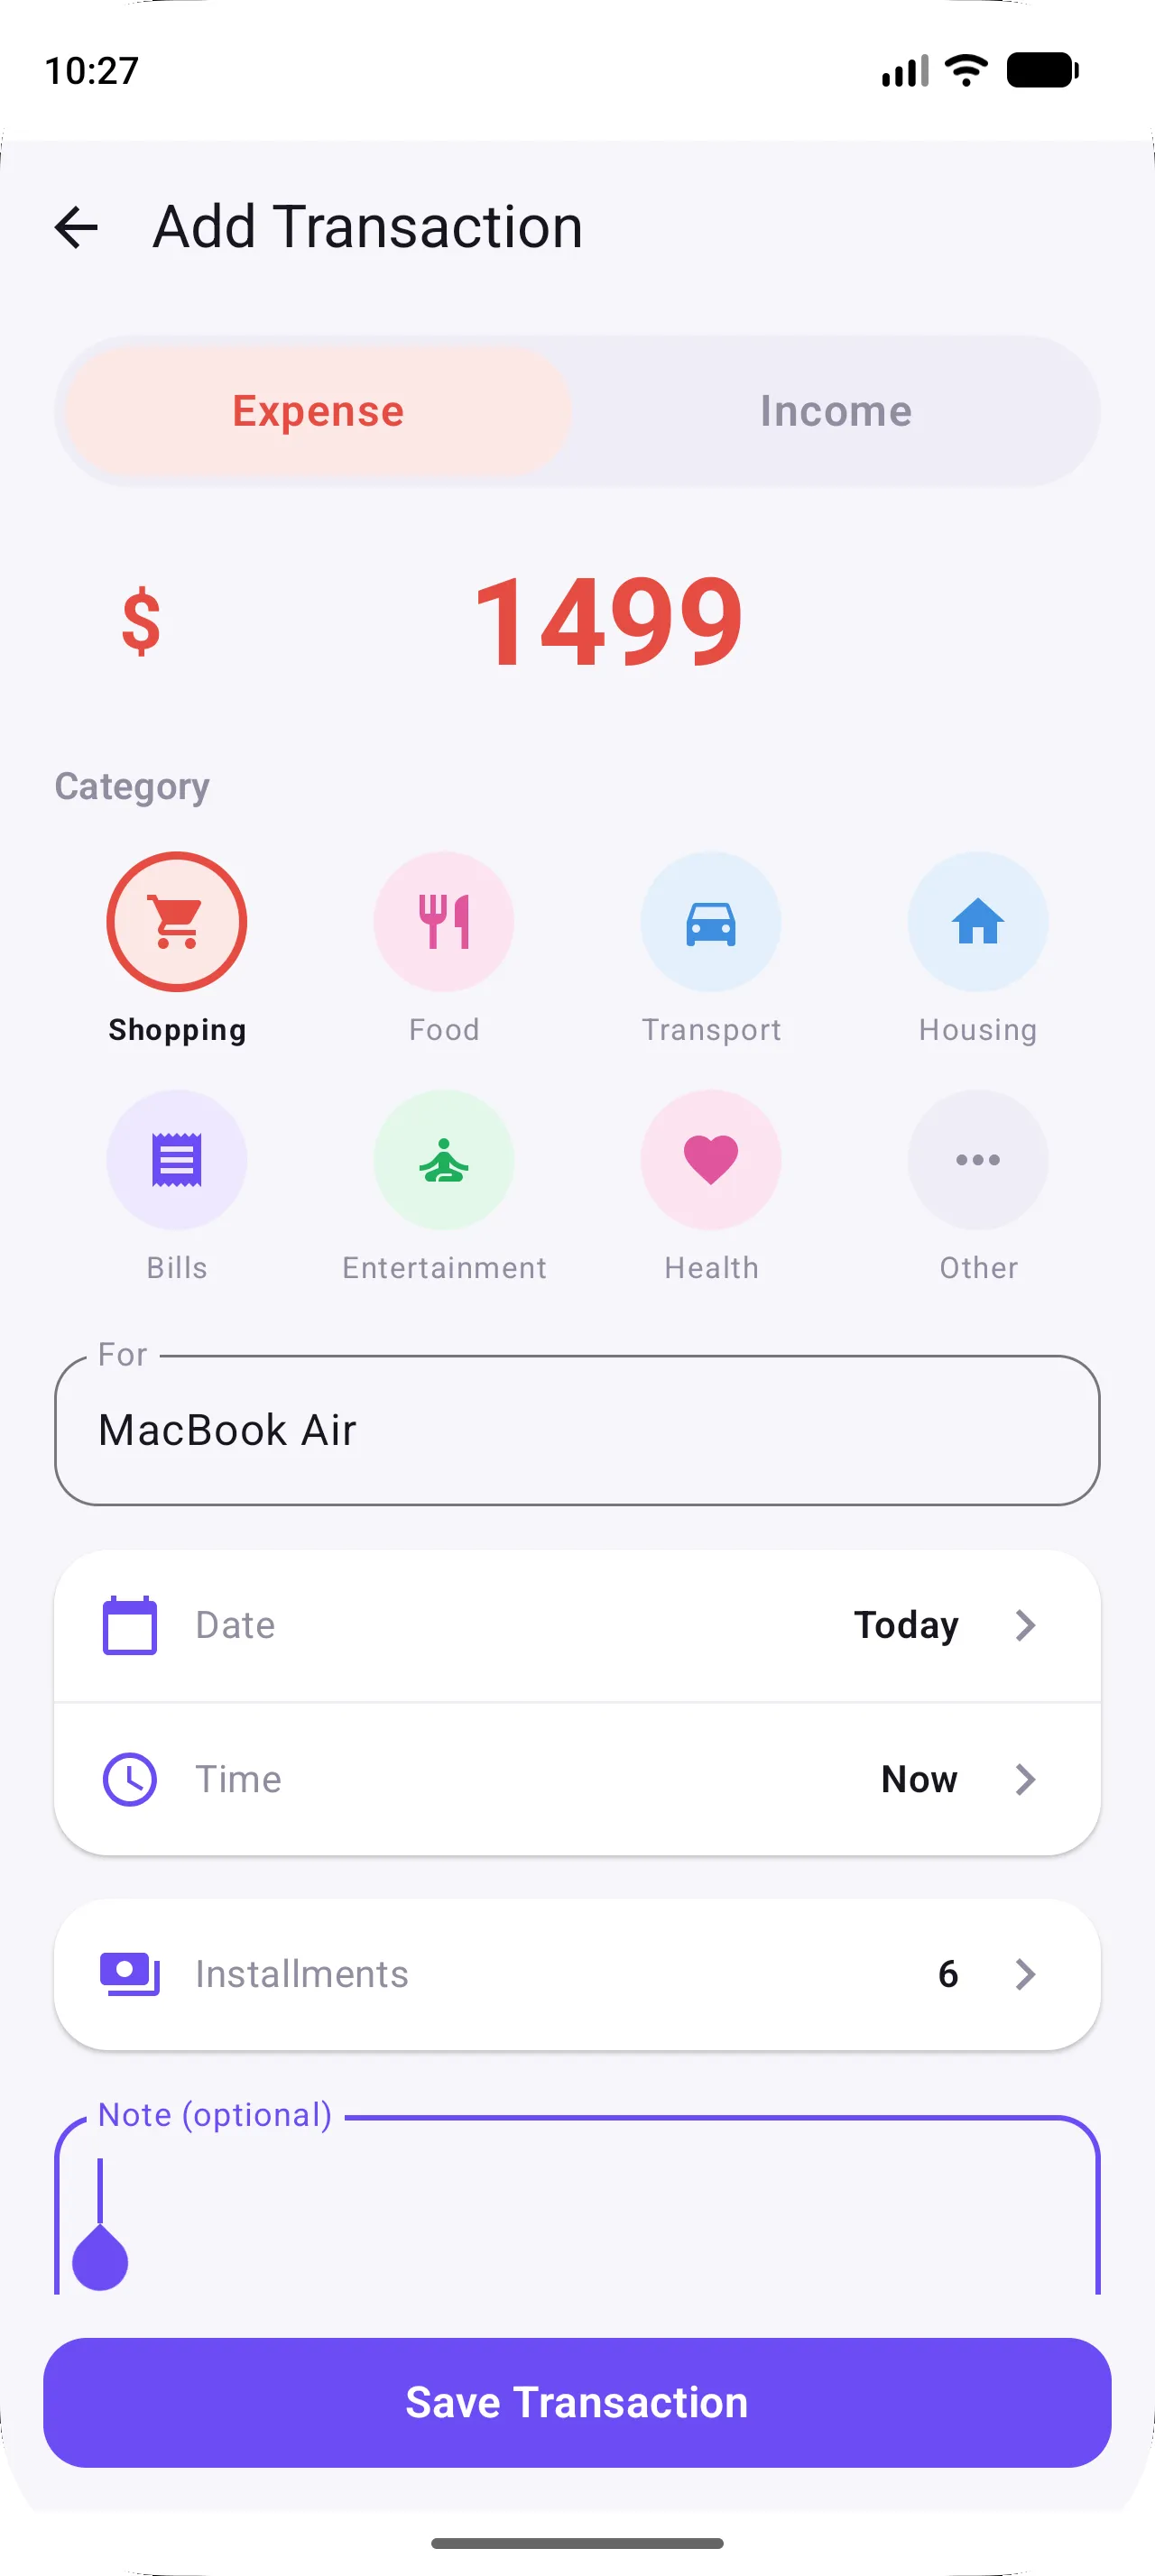
Bought something in payments? Enter the full price, then tap Installments and choose 2 to 36 payments. Japka creates one payment per month automatically, each marked like 2/12, so every month shows only what you actually pay that month. Read more in How to budget installments.
Step 5: Read your Summary
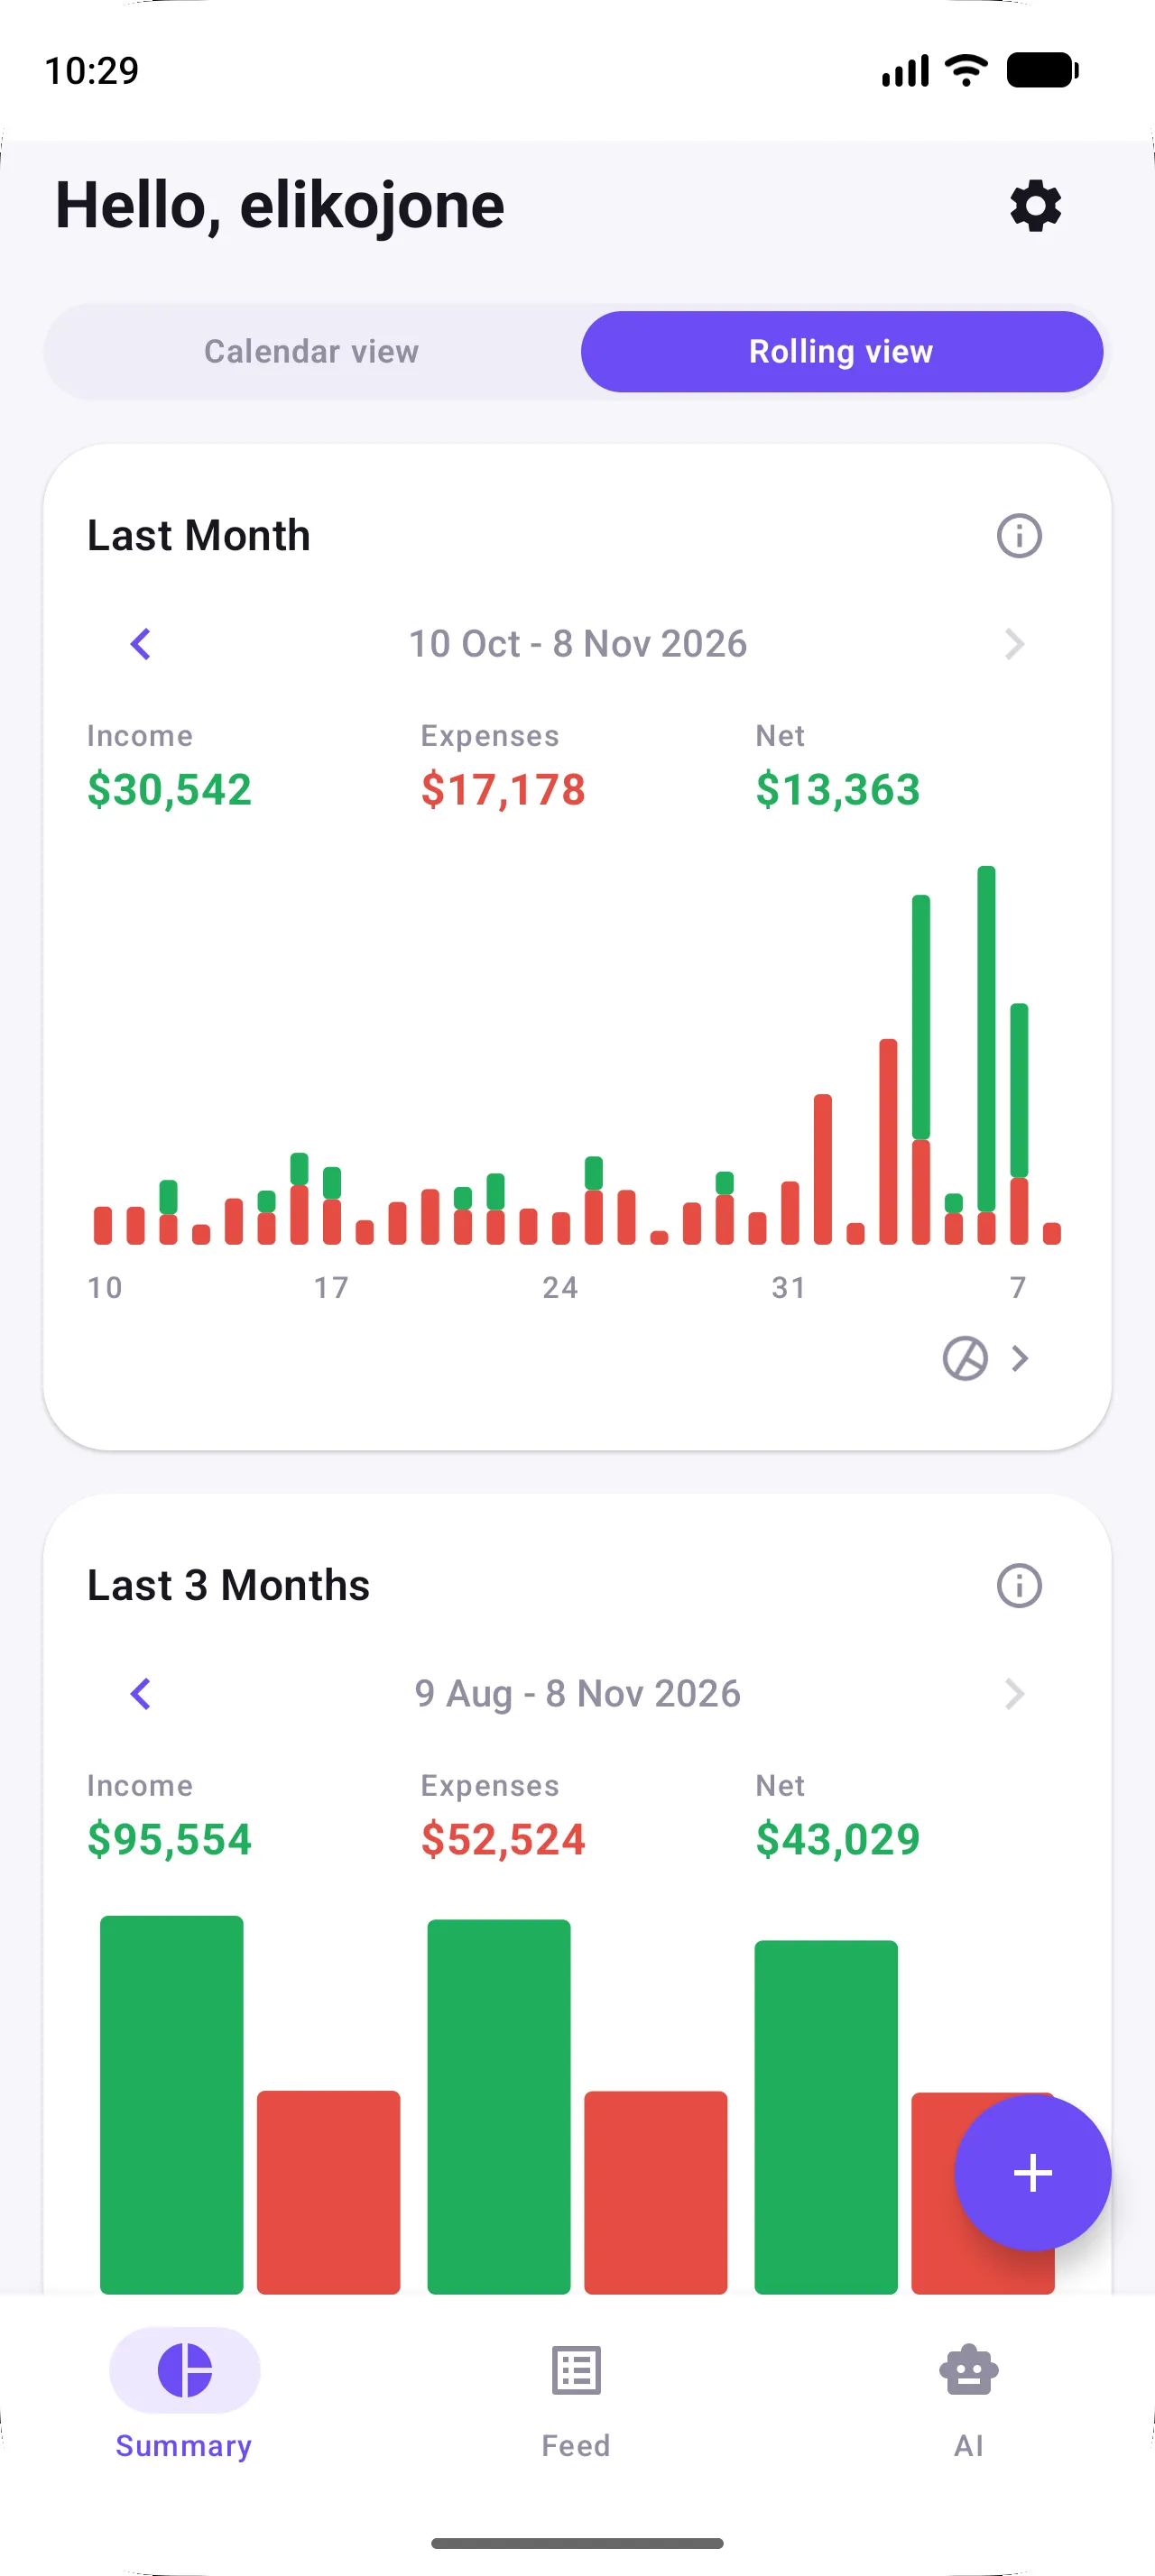
The Summary tab shows income, expenses and net balance in three cards:
- Last Month, with a bar per day,
- Last 3 Months, with a bar per month,
- Last Year.
Green is money in, red is money out. Use the arrows on a card to step back to earlier periods and compare.
Step 6: See where it went
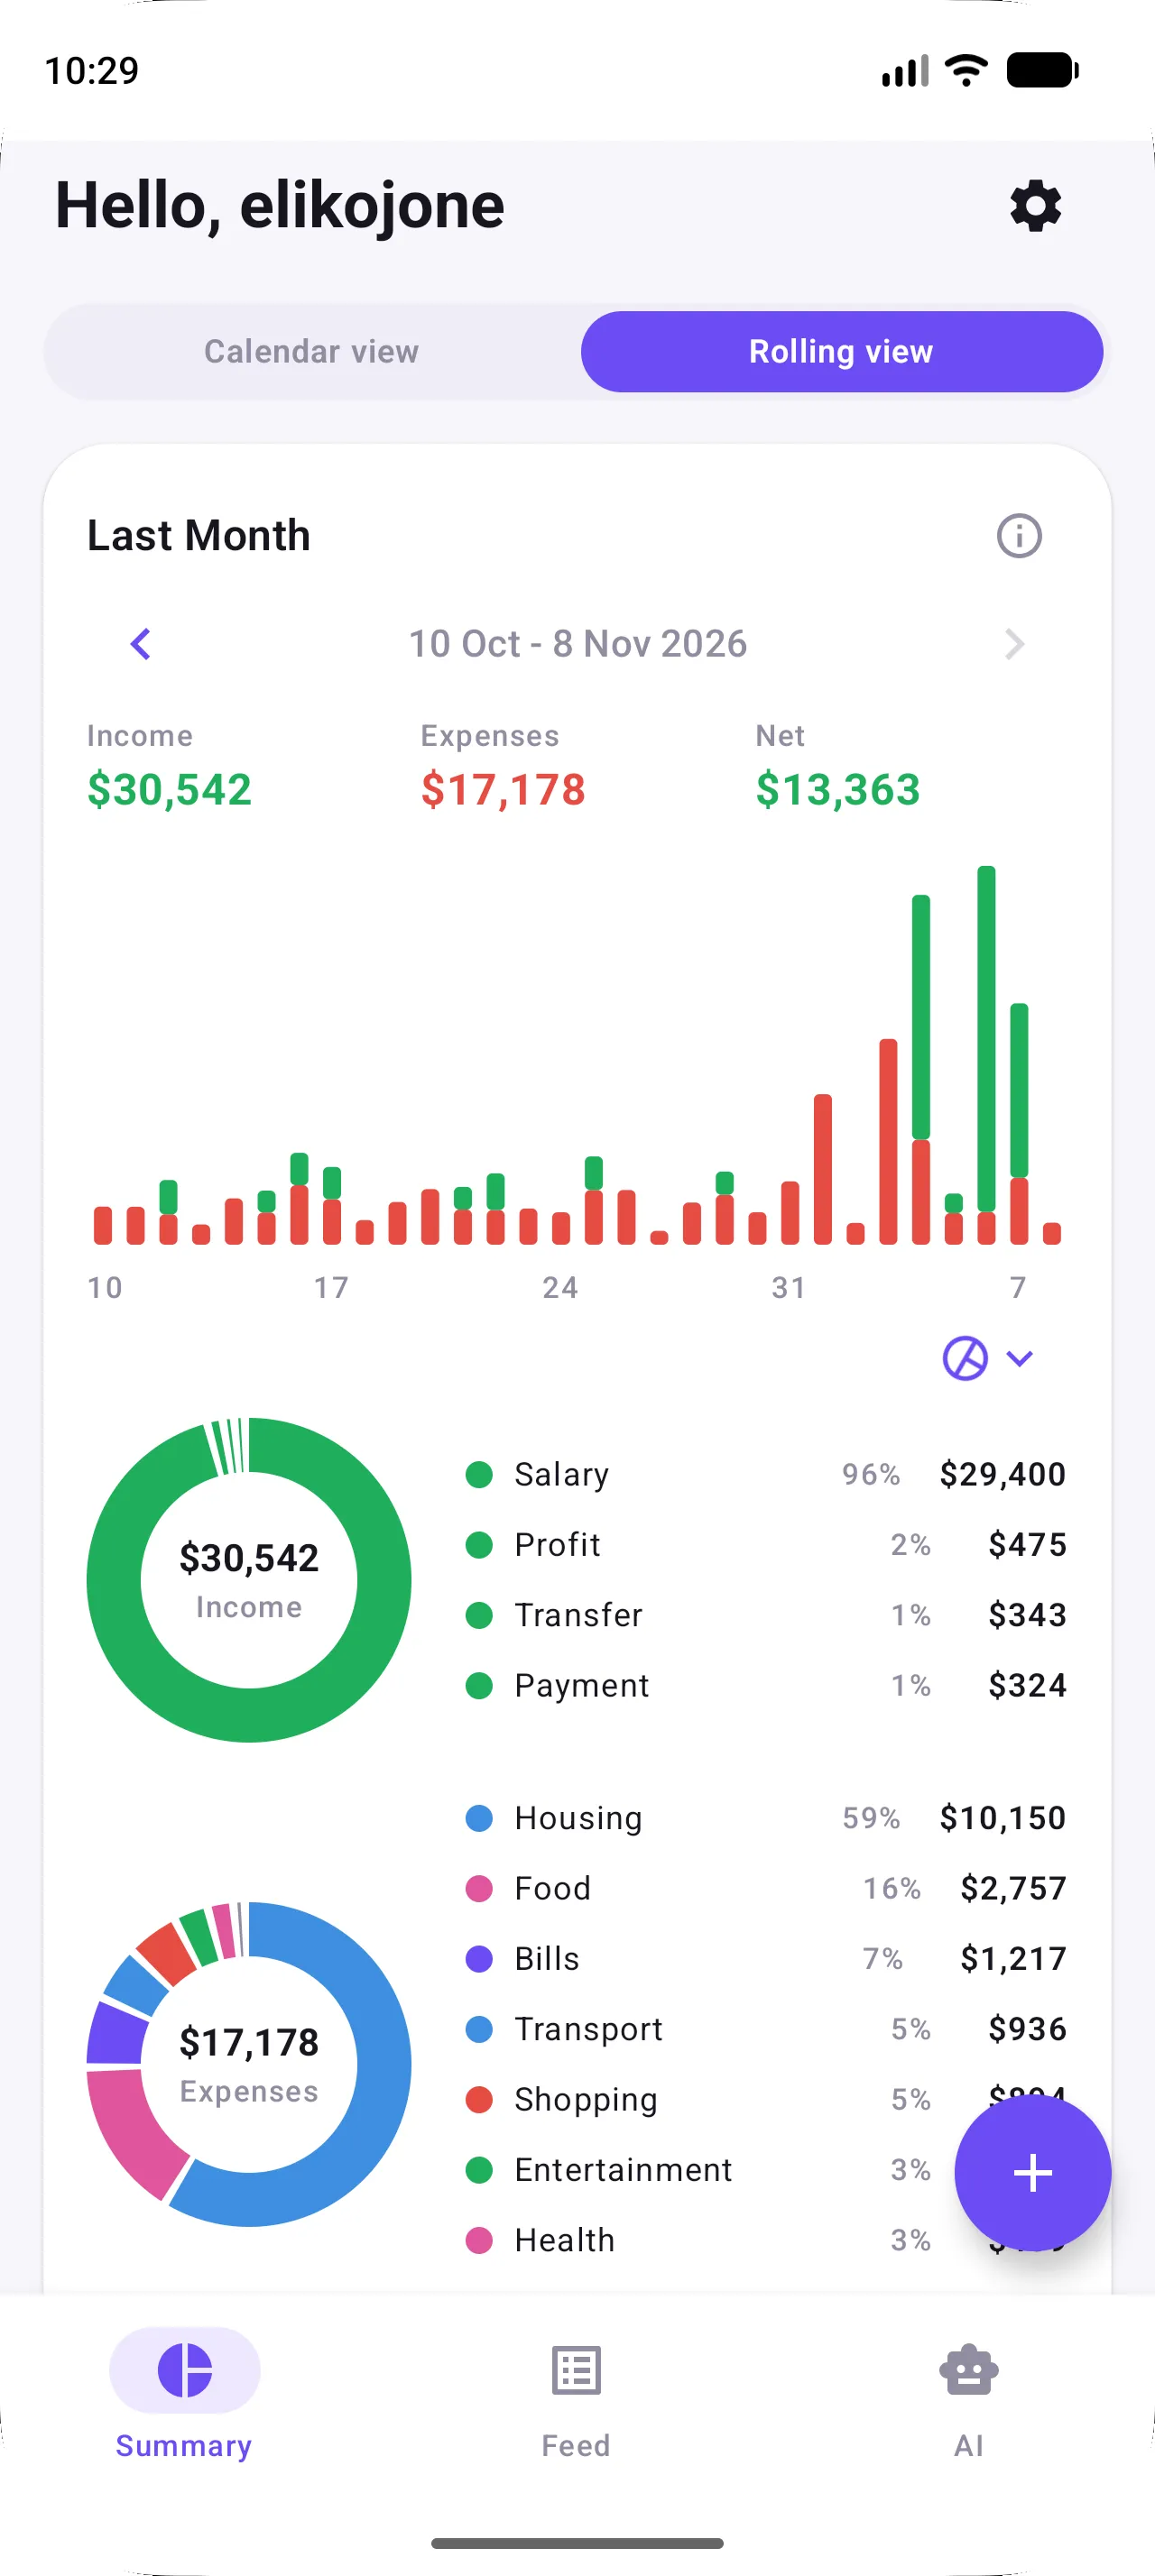
Tap the pie icon under any Summary card’s chart to open its Category breakdown: income and spending by category, each with its share and total. Switch between Calendar view (this month, quarter, year) and Rolling view (the last 30 days, 3 months, year) at the top.
Want it in words? With Premium, the AI tab answers questions like “Where does most of my money go?”. It runs on your phone, so your data stays on the device.
If one category takes a big share, the 50/30/20 rule is a simple way to decide whether that’s a problem.
Step 7: Find anything
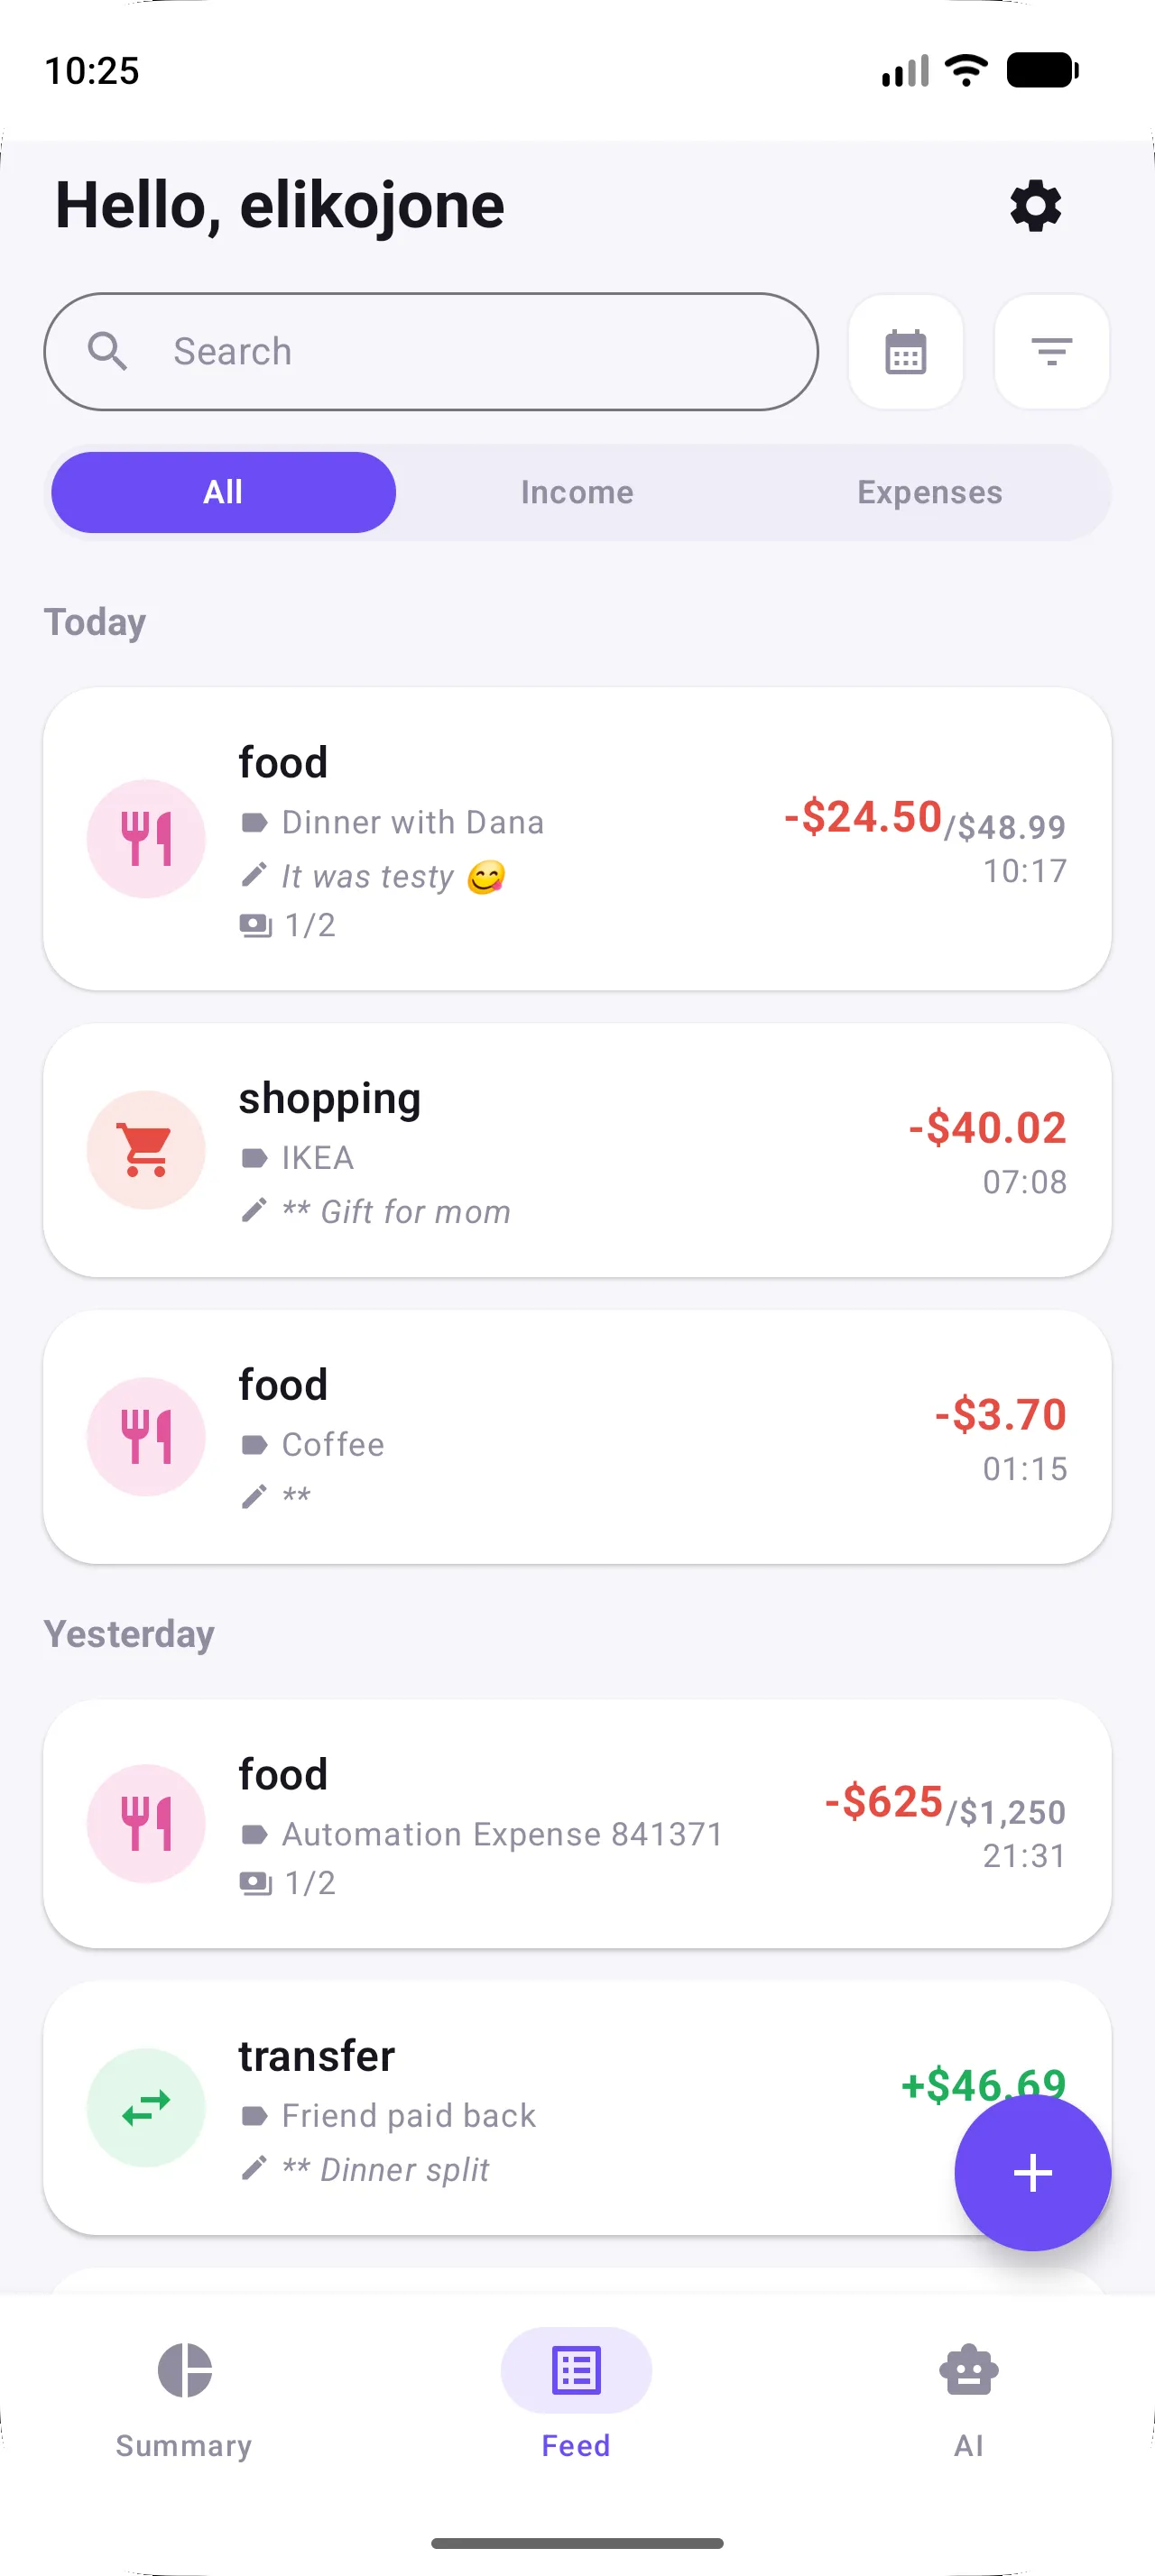
On the Feed:
- Search finds a transaction by text.
- The calendar picks a date range: last 7 days, last 30 days or custom.
- The filter shows one category.
- The All, Income and Expenses tabs switch what you see.
Optional: let Japka catch payments
Turn on Detect payments in Settings and Japka can offer to add card payments for you as they happen. See Log card payments automatically.
Your first week plan
- Day 1: add income, rent and bills.
- Days 2–6: log every expense right after paying. It takes seconds when it’s fresh.
- Day 7: open Summary and its Category breakdown. Pick one category to watch next week.
Why log by hand? Typing each expense makes you notice it, which is the point. Tracking expenses without connecting your bank explains the method in more detail.
Next steps
- Budget with someone? Set up a shared budget for couples.
- Paying by credit card? Budget by your card’s billing date.
- Want to ask questions about your spending in ChatGPT or Claude? Connect Japka to an AI chat.
FAQ
How do I add a transaction in Japka?
Tap the purple + button, choose Expense or Income, type the amount, pick a category, fill in who or what it was for, then tap Save Transaction. Date, time, installments and a note are optional.
Can I use Japka on more than one device?
Yes. Sign in with the same email, Apple or Google account and your transactions sync across your devices.
How do I change the currency or theme?
Tap the gear icon at the top of the screen to open Settings. You can choose Shekel, Dollar, Euro or Pound, and pick a light, dark or follow-system theme.
Can I bring in my old expense spreadsheet?
Yes. Save it as a CSV with date, for and amount columns and import it from Settings. CSV import is free.